Home Surveillance System With Node and a Raspberry Pi
May 19, 2020 - Originally posted on learn.vonage.com
Have you ever wondered how to build a home surveillance system? Perhaps to monitor your children, supervise vulnerable people in their home, or to be your home security system? This tutorial will guide you through how to the introductory process to build one.
In this tutorial, you get to build a small and cheap home surveillance system using a Raspberry Pi 4 with a Raspberry Pi Camera module and motion sensor. The software side of this will be using Vonage Video API (formerly TokBox OpenTok) to publish the stream and Vonage Messages API to notify the user that motion gets detected by SMS.
Here are some of the things you’ll learn in this tutorial:
- How to set up a Raspberry Pi,
- Install a Raspberry Pi camera and motion sensor,
- How to use Vonage Messages API (formerly Nexmo) to send SMS,
- How to use Vonage Video API (formerly TokBox OpenTok) to create and view a live stream.
Prerequisites
- Raspberry Pi 4
- Raspberry Pi Camera module
- Motion Sensor (HC-SR501 PIR)
- Vonage account
- TokBox Account
- Node & NPM installed on the Raspberry Pi
Raspberry Pi Installation and Setup
The Raspberry Pi Foundation is a UK-based charity enabling people worldwide to solve technological problems and express themselves creatively using the power of computing and digital technologies for work.
On their site is a great step by step guide on what each part of the Raspberry Pi device is, how to get the Operating System installed, and how to get started with using a Raspberry Pi. There are also many other resources to help with troubleshooting any issues you may be having, and lots of other projects that may interest you.
Camera and Motion Sensor Installation
Installing Raspberry Pi Camera Module
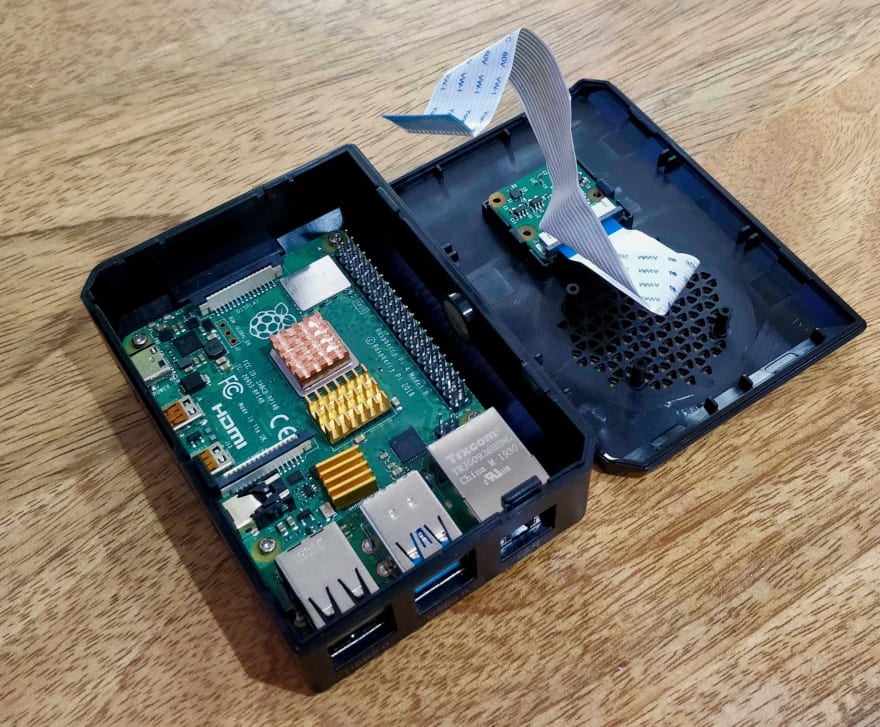
This tutorial uses a Raspberry Pi 4 and the official Raspberry Pi Camera module, although there should be no issues using other cameras.
The photograph below is of the Raspberry Pi and a Camera Module used in this article:
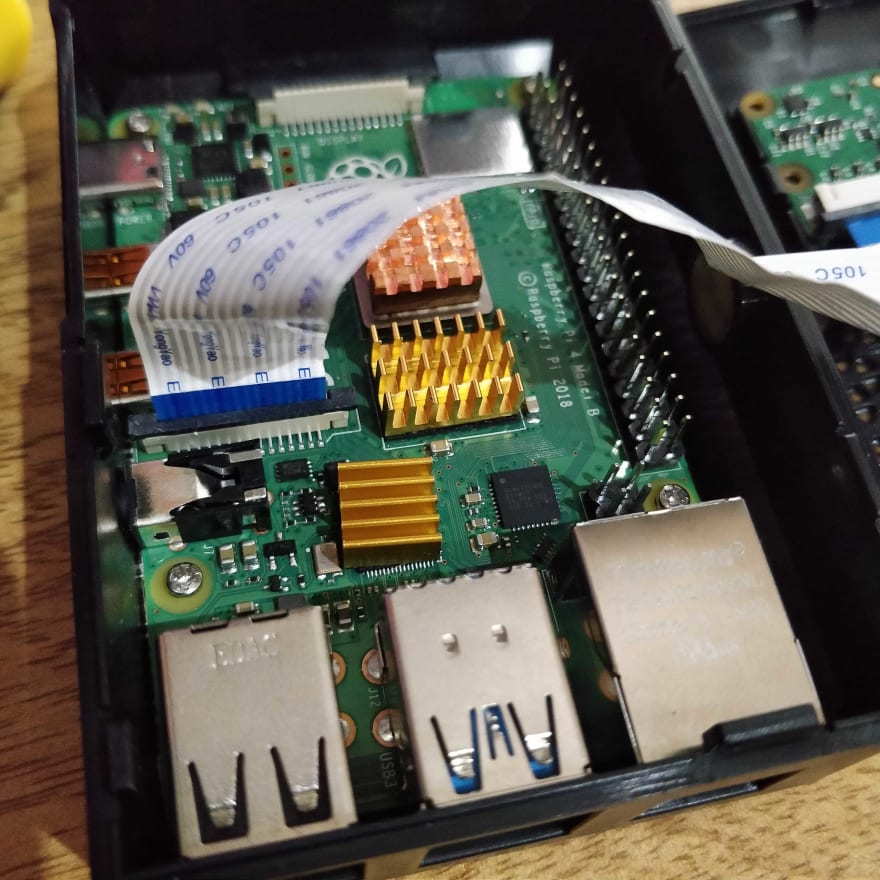
Connect the Camera Module via the ribbon cable into the Raspberry Pi’s Camera Module port. The photograph below shows where you should install the Camera Module ribbon:
Enabling SSH and Camera
Secure Shell (SSH) is a software package that enabled a secure connection and control of a remote system. The Raspberry Pi in this tutorial will run in headless mode, which means without a monitor, keyboard or mouse. With SSH enabled, you will be able to connect to the device remotely on your computer or phone.
To enable SSH, in the Raspberry Pi terminal, run:
sudo raspi-config
You will see a screen like an image similar to what’s shown below:
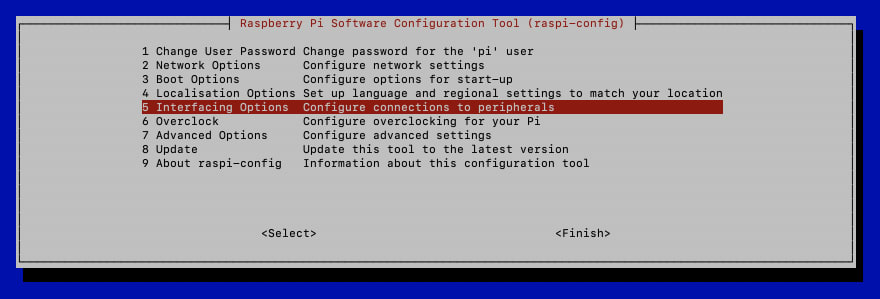
Choose option 5 – Interfacing Options
- From the next menu, choose Option P1 for
Camera, then selectYes, - Following this choose Option P2 for
SSH, again selectYes.
You have now enabled the Camera module and SSH on your Raspberry Pi.
Installing the Motion Sensor
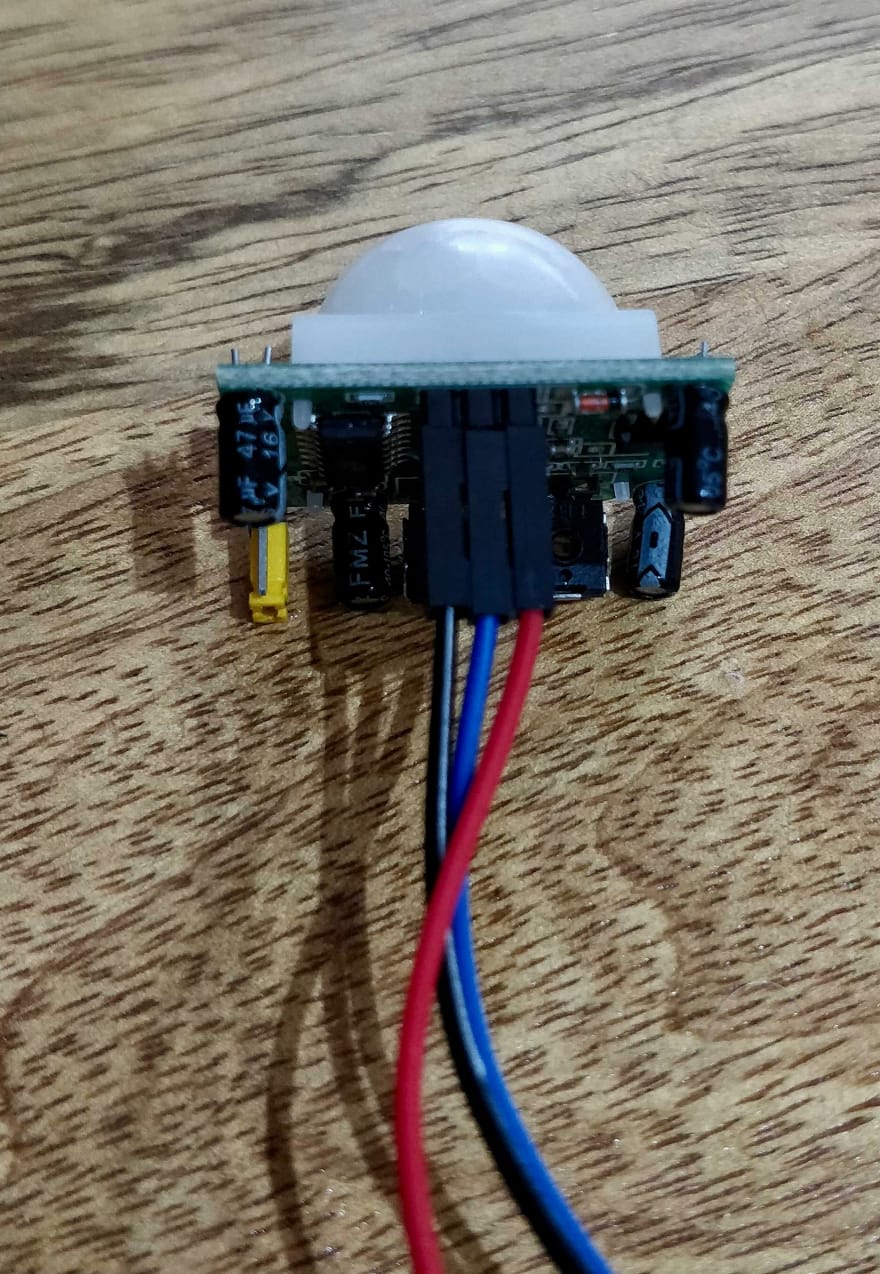
The next step is to wire the Raspberry Pi to a motion sensor. This tutorial uses the HC-SR501 PIR motion sensor; however, other motion sensor modules should work fine. Please refer to their wiring guides for wiring them to your Raspberry Pi.
First, take the sensor and connect three wires to it. I’ve used red for the live, blue for the GPIO, and black for ground. For the sensor in this example, the first pin is ground, second GPIO and third live as shown:
A great example to describe each of the pins on the Raspberry Pi is on The Raspberry Pi Website. The diagram illustrates the layout of the GPIO pins, as shown below:
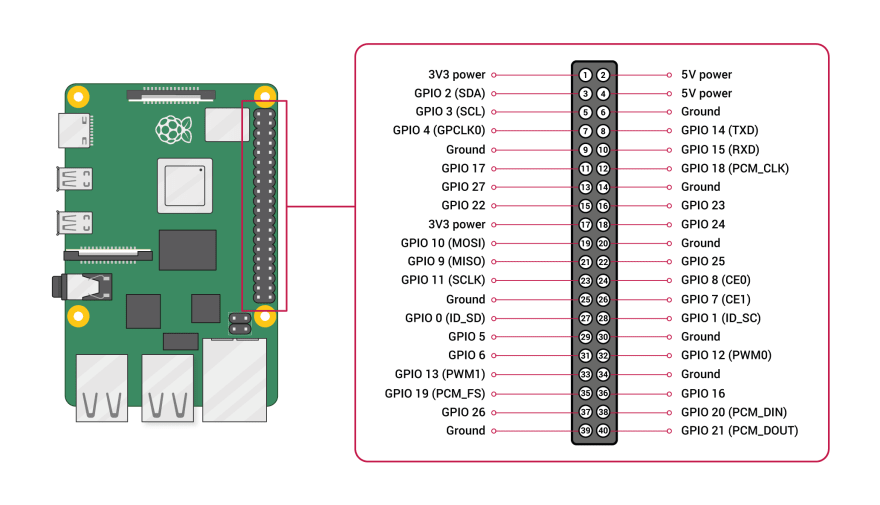
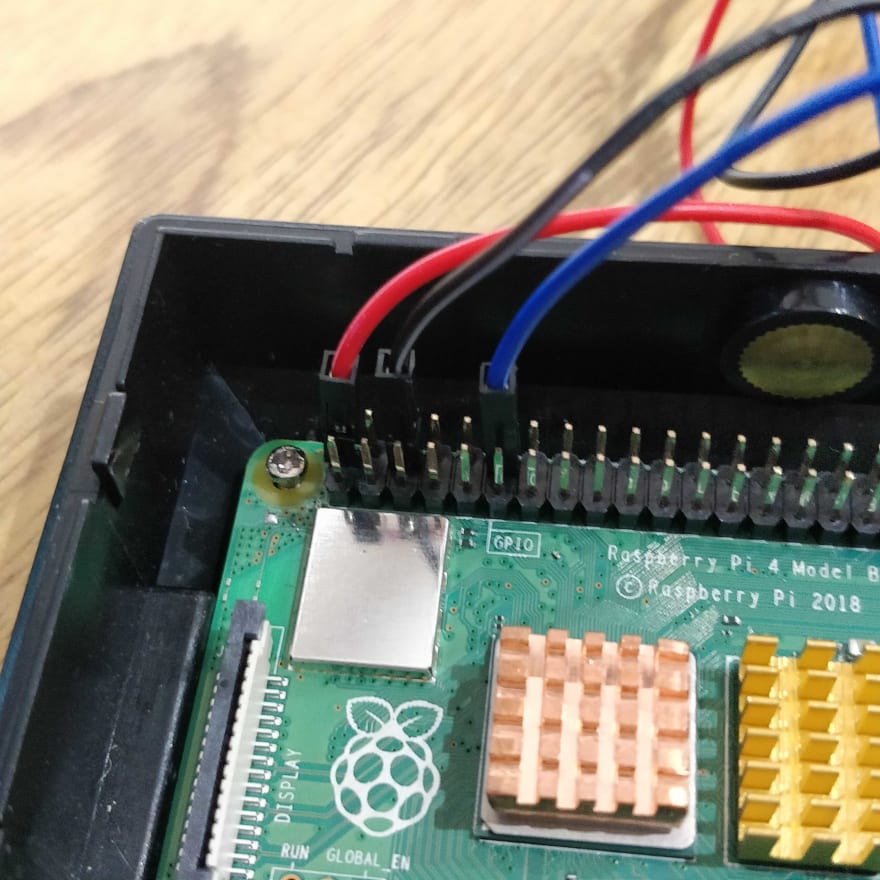
The final part is connecting the wires to the Raspberry Pi. The live (red) wire needs to be connected to one of the 5V power pins on the Pi, referring to the diagram above I used pin 2. The ground (black) wire needs to be connected to one of the GND pins on the Pi, again referring to the diagram I used pin 6. The final wire to join is the GPIO (blue) wire, which needs to connect to one of the GPIO pins. In this example, I used pin 12, labelled “GPIO 18”.
The final wiring setup is shown below:
Testing Motion Detection
Now all the hardware is installed and configured, and it’s time to build the code for the project. However, first, a Node project needs creating, to test for motion testing and prepare for the project ahead. This project is where you will write all of the motion detection and video streaming code. To create a new Node project, make a new directory, change to that directory and run npm init. Running the commands listed below do all three of these:
mkdir /home/pi/pi-cam/
cd /home/pi/pi-cam/
npm init
Follow the instructions requested, set a name for the project and leave the rest of the inputs as defaults.
The following commands create a new index.js, which will store the majority of your code, and install a new package called onoff that allows the controlling of the GPIO pins:
touch index.js
npm install onoff
Inside your new index.js file copy the following code which reads the GPIO pin 18 to alert if motion has been detected, or alert when the movement has stopped.
const gpio = require('onoff').Gpio;
const pir = new gpio(18, 'in', 'both');
pir.watch(function(err, value) {
if (value == 1) {
console.log('Motion Detected!')
} else {
console.log('Motion Stopped');
}
});
Time to check whether the code above and installation of the motion sensor was successful. Run:
node index.js
Wave your hand in front of the motion sensor, then watch the Terminal to see “Motion Detected!”. A few seconds later you’ll see “Motion stopped” output.
Testing the Camera
In your Raspberry Pi command line, type the following command to take a still photo of the camera’s view.
NOTE If you have logged in as a user other than the default pi, replace pi with your username.
raspistill -o /home/pi/cam.jpg
Looking in the directory /home/pi/ you’ll now see cam.jpg. Opening it will show you a photo of your Raspberry Pi’s current camera view.
Node and NPM
node --version
npm --version
Both Node and NPM need to be installed and at the correct version. Go to nodejs.org, download and install the correct version if you don’t have it.
Our CLI
To set up your application, you’ll need to install our CLI. Install it using NPM in the terminal.
npm install -g nexmo-cli@beta
You can check you have the correct version with this command. At the time of writing, I was using version 0.4.9-beta-3.
nexmo --version
Remember to sign up for a free Vonage account and configure the CLI with the API key and API secret found on your dashboard.
nexmo setup <your_api_key> <your_api_secret>
Git (Optional)
You can use git to clone the demo application from GitHub.
For those uncomfortable with git commands, don’t worry, I’ve you covered.
Follow this guide to install git.
Install a Mysql Server
On the Raspberry Pi, run the following command to install the MySQL database server:
sudo apt install mariadb-server
By default, the MySQL server gets installed with the root user having no password. You need to rectify this, to ensure the database isn’t insecure. On the Pi run the command below and follow the instructions.
sudo mysql_secure_installation
Now the root user’s password is set, it’s time to create a database and user to access that database. Connect to the MySQL server:
sudo mysql -u root -p
-- Creates the database with the name picam
CREATE DATABASE picam;
-- Creates a new database user "camuser" with a password "securemypass" and grants them access to picam
GRANT ALL PRIVILEGES ON picam.* TO `camuser`@localhost IDENTIFIED BY "securemypass";
-- Flushes these updates to the database
FLUSH PRIVILEGES;
Your Raspberry Pi is now set up and ready for the code part of this tutorial.
Building the Application
Installing an SSL Certificate
In your Raspberry Pi’s Terminal, change directory to your project path and run the following command to generate a self-signed SSL certificate. Vonage Video API requires HTTPS to be accessed, so an SSL certificate is needed, even if it’s self-signed. Run the command below to generate your SSL certificates.
openssl req -x509 -newkey rsa:4096 -keyout key.pem -out cert.pem -days 365
Two files get created, key.pem and cert.pem, move these to a location your code can access. For this tutorial, they’re in the project directory.
The Web Server
Express is a minimal and flexible Node.js web application framework that provides a robust set of features for web and mobile applications.
Express is a very lightweight, flexible Node.js framework that is what you need in this project. To provide endpoints for you to access your video stream.
Install Express into your application with the following command:
npm install express --save
At the top of the index.js file, you need to import the packages https, fs and express. Make the following changes:
+ const express = require('express');
+ const https = require('https');
+ const fs = require('fs');
const gpio = require('onoff').Gpio;
+ const app = express();
const pir = new gpio(18, 'in', 'both');
pir.watch(function(err, value) {
if (value == 1) {
console.log('Motion Detected!')
- } else {
- console.log('Motion Stopped');
}
});
You don’t need the else part of the motion detection for this tutorial. So remove that part too, as shown above.
You need a web server to access your video stream over the network or Internet. Time to create a method to initiate a new server with an example endpoint. Above pir.watch(function(err, value) { add
async function startServer() {
const port = 3000;
app.get('/', (req, res) => {
res.json({ message: 'Welcome to your webserver!' });
});
const httpServer = https.createServer({
// The key.pem and cert.pem files were created by you in the previous step, if the files are not stored in the project root directory
// make sure to update the two lines below with their correct paths.
key: fs.readFileSync('./key.pem'),
cert: fs.readFileSync('./cert.pem'),
// Update this passphrase with what ever passphrase you entered when generating your SSL certificate.
passphrase: 'testpass',
}, app);
httpServer.listen(port, (err) => {
if (err) {
return console.log(`Unable to start server: ${err}`);
}
return true;
});
}
A way to access this function is now needed, below your function startServer() {} add a call to the function as shown:
startServer();
To test this is working, in your Terminal, run:
node index.js
Note: If you’re connected to your Raspberry Pi via SSH or keyboard/tv, in the Terminal type:
ifconfigto find out your Raspberry Pi’s local IP address.
Accessing your Raspberry Pi’s IP address in your browser: https://<ip address>:3000/ will return
{"message":"Welcome to your webserver!"}
Installing Sequelize
Sequelize is a powerful library for Node to make querying a database easier. It is an Object-Relational Mapper (ORM), which maps objects to the database schemas. Sequelize covers various protocols such as Postgres, MySQL, MariaDB, SQLite, and Microsoft SQL Server. This tutorial will use MariaDB server because that's the SQL server available on the Raspberry Pi.
# DotEnv is used to access your .env variables
# Sequelize is an ORM for your DATABASE
# mysql2 is what you're using as a database. Sequelize needs to know this.
npm install --save dotenv sequelize mysql2
# Sequelize-cli allows you to generate models, migrations and run these migrations.
npm install -g sequelize-cli
# Initializes Sequelize into the project, creating the relevant files and directories
sequelize init
Inside your project directory, create a new file .env, and update the values below with the correct credentials for your database.
DB_NAME=<database name>
DB_USERNAME=<database username>
DB_PASSWORD=<database password>
DB_HOST=127.0.0.1
DB_PORT=3306
Within the config directory create a new file called config.js. This file is where the projects database settings are stored, and being javascript, it can access the .env file:
require('dotenv').config();
module.exports = {
development: {
database: process.env.DB_NAME,
username: process.env.DB_USERNAME,
password: process.env.DB_PASSWORD,
host: process.env.DB_HOST,
port: process.env.DB_PORT,
dialect: 'mysql',
operatorsAliases: false
},
}
Now in models/index.js, find and replace:
- const config = require(__dirname + '/../config/config.json')[env];
+ const config = require(__dirname + '/../config/config.js')[env];
Back in your main index.js file, import the models/index.js file for your application to access your database models:
const db = require('./models/index');
Generating and Running a Migration
When a Vonage Video session gets created, a session ID gets returned, this session ID needs to be stored somewhere for you to connect to it remotely. The best way to do this is a database table. Using the recently installed Sequelize CLI, run the command below. It creates a new table called Session, with two new columns:
- sessionId (which is a string),
- active (which is a boolean).
# Generate yourself a Session model, this is going to be used to store the sessionId of the video feed
sequelize model:generate --name Session --attributes sessionId:string,active:boolean
Two new files get created after this command is successful, these are:
models/session.jsmigrations/<timestamp>-Session.js
The new model, session.js, defines what the database expects in terms of column names, data types, among other things.
The new migrations file defines what is to be persisted to the database when the migration is successful. In this instance, it creates a new database table called sessions with five new columns:
- id
- sessionId
- active
- createdAt
- updatedAt
Run this migration using the Sequelize CLI command with the parameters db:migrate:
sequelize db:migrate
The output will be the same as the example below:
== 20200504091741-create-session: migrating =======
== 20200504091741-create-session: migrated (0.051s)
You now have a new database table that you will later use to store the session ID.
Vonage Video
You’re about to install two libraries the project needs, Vonage Video (formerly TokBox OpenTok), and Puppeteer.
Vonage Video (formerly TokBox OpenTok) is a service that provides live interactive video sessions to people globally. The Vonage Video API (formerly TokBox OpenTok) uses the WebRTC industry standard. It allows people to create custom video experiences across billions of devices, whether it be mobile, web or desktop applications.
Puppeteer is a Node library that provides a method to control Chrome or Chromium programmatically. By default, Puppeteer runs in a headless mode, but can also run in a non-headless mode of Chrome or Chromium. A headless browser is a browser without a graphical user interface, (such as no monitor for the user to see).
Install both of these libraries by running the command below:
npm install opentok puppeteer
Copy the additions to the code in your index.js as shown below. This code imports three libraries into your project.
- OpenTok (To publish/subscribe to video stream with Vonage Video)
- Puppeteer (For your Raspberry Pi to open a browser in headless mode to publish the stream)
- DotEnv (To access the .env variables)
An OpenTok object gets initialized using your Vonage API Key and Secret .env variables you have yet to add.
const gpio = require('onoff').Gpio;
+ const OpenTok = require('opentok');
+ const puppeteer = require('puppeteer');
+ const dotenv = require('dotenv');
const app = express();
const pir = new gpio(23, 'in', 'both');
+ dotenv.config();
+ const opentok = new OpenTok(
+ process.env.VONAGE_VIDEO_API_KEY,
+ process.env.VONAGE_VIDEO_API_SECRET,
+ );
You’ll need your Vonage Video API key and API secret. You can find these by logging into your Vonage Video Video API account.
Next, create a new Project. Once created, you will see your project’s dashboard, which contains the API key and API secret.
Inside your .env file add the Vonage Video credentials as below (Updating the values inside < and > with your credentials):
VONAGE_VIDEO_API_KEY=<tokbox api key>
VONAGE_VIDEO_API_SECRET=<tokbox api secret>
Creating a Vonage Video Session
In your index.js file, find the part of the code that initializes the OpenTok object, and add three variables called:
canCreateSession, determines whether your project can create a session or not (if a session is already active)session, is the variable to hold the current session objecturlis the variable to keep the current URL of the session (in this case, a Ngrok URL)
const opentok = new OpenTok(
process.env.VONAGE_VIDEO_API_KEY,
process.env.VONAGE_VIDEO_API_SECRET,
);
+ let canCreateSession = true;
+ let session = null;
+ let url = null;
Time to create a session and store the returned session ID in the database for use when the user clicks on the link to view the published stream. Copy the code below to add the functions that achieve this:
async function createSession() {
opentok.createSession({ mediaMode: 'routed' }, (error, session) => {
if (error) {
console.log(`Error creating session:${error}`);
return null;
}
createSessionEntry(session.sessionId);
return null;
});
}
function createSessionEntry(newSessionId) {
db.Session
.create({
sessionId: newSessionId,
active: true,
})
.then((sessionRow) => {
session = sessionRow;
return sessionRow.id;
});
}
The session watcher part of the project needs to be updated to determine whether canCreateSession is true, if this is the case, set it to false (so no other streams get created while this one is active), then create the session by calling the method previously added to the project createSession. This is done by updating the following code:
pir.watch(function(err, value) {
- if (value == 1) {
+ if (value === 1 && canCreateSession === true) {
+ canCreateSession = false;
console.log('Motion Detected!');
+ createSession();
}
});
Creating a Publisher and Subscriber
A new directory is needed which holds the front-facing pages for the Pi to publish its stream, and the client (you) to subscribe to a stream. Create a new public directory with its accompanying css, js, and config directories with the commands below:
mkdir public
mkdir public/css
mkdir public/js
mkdir public/config
You’re going to need some styling for your page that the client sees, so create a new app.css file inside public/css/ and copy the code below into this file. The CSS below ensures the size of the content is 100% in height, the background colour is grey, and the video stream is full screen for maximum visibility.
body, html {
background-color: gray;
height: 100%;
}
#videos {
position: relative;
width: 100%;
height: 100%;
margin-left: auto;
margin-right: auto;
}
#subscriber {
position: absolute;
left: 0;
top: 0;
width: 100%;
height: 100%;
z-index: 10;
}
#publisher {
position: absolute;
width: 360px;
height: 240px;
bottom: 10px;
left: 10px;
z-index: 100;
border: 3px solid white;
border-radius: 3px;
}
Next, you will need to create a new javascript file that gets used on the client’s side (so in your browser as the subscriber). This file will initialize a Vonage Video session, get the session details from the backend with a GET request and if the route is /serve it will publish the stream if the URL path is /client it will subscribe to the current active video stream. In public/js/ create a new app.js file and copy the following code into it:
let apiKey;
let sessionId;
let token;
let isPublisher = false;
let isSubscriber = false;
let url = '';
// Handling all of our errors here by alerting them
function handleError(error) {
if (error) {
console.log(error.message);
}
}
function initializeSession() {
const session = OT.initSession(apiKey, sessionId);
// Subscribe to a newly created stream
if (isSubscriber === true) {
session.on('streamCreated', (event) => {
session.subscribe(event.stream, 'subscriber', {
insertMode: 'append',
width: '100%',
height: '100%',
}, handleError);
});
}
if (isPublisher === true) {
// Create a publisher
let publisher = OT.initPublisher('publisher', {
insertMode: 'append',
width: '100%',
height: '100%',
}, handleError);
}
// Connect to the session
session.connect(token, (error) => {
// If the connection is successful, publish to the session
if (error) {
handleError(error);
} else if (isPublisher === true) {
session.publish(publisher, handleError);
}
});
}
function setDetails(details) {
apiKey = details.apiKey;
sessionId = details.sessionId;
token = details.token;
initializeSession();
}
async function getDetails(publisher, subscriber, url) {
const request = await fetch(url);
const response = await request.json();
if (publisher === true) {
isPublisher = true;
}
if (subscriber === true) {
isSubscriber = true;
}
setDetails(response);
}
function fetchUrl() {
return fetch('/config/config.txt')
.then( r => r.text() )
.then( t => { url = t} );
}
Two new HTML files are needed for these two new endpoints /serve and /client, these make use of the Vonage Video client-side javascript library to publish or subscribe to current active sessions.
Create a new server.html file inside the public/ directory with the following contents:
<html>
<head>
<link type="text/css" rel="stylesheet" href="/css/app.css">
<script src="https://static.opentok.com/v2/js/opentok.min.js"></script>
<script src="https://unpkg.com/axios/dist/axios.min.js"></script>
</head>
<body>
<h1>Publisher view</h1>
<div id="videos">
<div id="publisher"></div>
</div>
<script type="text/javascript" src="/js/app.js"></script>
<script type="text/javascript">
getDetails(true, false, 'https://localhost:3000/get-details');
</script>
</body>
</html>
For the /client endpoint, create a new client.html file inside the public/ directory and copy the following code:
<html>
<head>
<link type="text/css" rel="stylesheet" href="/css/app.css">
<script src="https://static.opentok.com/v2/js/opentok.min.js"></script>
<script src="https://unpkg.com/axios/dist/axios.min.js"></script>
</head>
<body>
<h1>Subscriber view</h1>
<div>
<button onclick="getDetails(false, true, url + 'get-details')">Watch Video Stream</button>
</div>
<div id="videos">
<div id="subscriber"></div>
</div>
<script type="text/javascript" src="/js/app.js"></script>
</body>
</html>
You don’t have the endpoints defined yet in your backend code (index.js), so time to build those! Find the original endpoint you created:
app.get('/', (req, res) => {
res.json({ message: 'Welcome to your webserver!' });
});
Replace it with the following code:
// Adds the public directory to a publicly accessible directory within our new web server
app.use(express.static(path.join(`${__dirname}/public`)));
// Creates a new endpoint `/serve` as a GET request, which provides the contents of `/public/server.html` to the users browser
app.get('/serve', (req, res) => {
res.sendFile(path.join(`${__dirname}/public/server.html`));
});
// Creates a new endpoint `/client` as a GET request, which provides the contents of `/public/client.html` to the users browser
app.get('/client', (req, res) => {
res.sendFile(path.join(`${__dirname}/public/client.html`));
});
// Creates a new endpoint `/get-details` as a GET request, which returns a JSON response containing the active Vonage Video session, the API Key and a generated Token for the client to access the stream with.
app.get('/get-details', (req, res) => {
db.Session.findAll({
limit: 1,
where: {
active: true,
},
order: [['createdAt', 'DESC']],
}).then((entries) => res.json({
sessionId: entries[0].sessionId,
token: opentok.generateToken(entries[0].sessionId),
apiKey: process.env.VONAGE_VIDEO_API_KEY,
}));
});
If you look carefully in the above code, you’re using a new library called path. So at the top of the index.js file, include path as shown below:
const path = require('path');
Nothing happens until you publish the display on the Raspberry Pi.
Inside .env add another variable (60000 milliseconds is the equivalent to 60 seconds):
VIDEO_SESSION_DURATION=60000
Back inside index.js add functionality that will close the stream when the function closeSession() is called:
async function closeSession(currentPage, currentBrowser) {
console.log('Time limit expired. Closing stream');
await currentPage.close();
await currentBrowser.close();
if (session !== null) {
session.update({
active: false
});
}
}
Now is the time to create the publishing of the stream in headless mode, the function below does the following all in headless mode:
- Creates a new browser instance,
- Opens a new page / tab,
- Overrides permissions for the camera and microphone on the browser,
- Directs the page to the
/serveendpoint to publish the video stream, - Creates a new timer to stop the video stream after a certain length of time,
- Creates another timer to provide a buffer between the stream ending and when another is allowed to start
Copy the code below into your index.js file:
async function startPublish() {
// Create a new browser using puppeteer
const browser = await puppeteer.launch({
headless: true,
executablePath: 'chromium-browser',
ignoreHTTPSErrors: true,
args: [
'--ignore-certificate-errors',
'--use-fake-ui-for-media-stream',
'--no-user-gesture-required',
'--autoplay-policy=no-user-gesture-required',
'--allow-http-screen-capture',
'--enable-experimental-web-platform-features',
'--auto-select-desktop-capture-source=Entire screen',
],
});
// Creates a new page for the browser
const page = await browser.newPage();
const context = browser.defaultBrowserContext();
await context.overridePermissions('https://localhost:3000', ['camera', 'microphone']);
await page.goto('https://localhost:3000/serve');
let sessionDuration = parseInt(process.env.VIDEO_SESSION_DURATION);
let sessionExpiration = sessionDuration + 10000;
// Closes the video session / browser instance when the predetermined time has expired
setTimeout(closeSession, sessionDuration, page, browser);
// Provides a buffer between the previous stream closing and when the next can start if motion is detected
setTimeout(() => { canCreateSession = true; }, sessionExpiration);
}
Time to make use of the function you’ve just put into your project, find and add startPublish() to your code:
createSessionEntry(session.sessionId);
+ startPublish();
You’re almost at a point you can test your code! You’ve created new endpoints, accessible either as a publisher or a subscriber to the video. Next, you want to have a URL to access the stream if you’re in a remote location.
Ngrok
If you wish to connect to the camera stream remotely, outside of the network, the Raspberry Pi has connected to, and you’ll need to expose your web server to the Internet. It’s time to install and use Ngrok.
By running the command below, Ngrok will only be installed locally for the project:
npm install ngrok
You now need to implement the usage of Ngrok into your project. So at the top of the index.js file include the ngrok package:
const ngrok = require('ngrok');
Now you need to create a function that connects to Ngrok. When successful it will save the URL returned into a file public/config/config.txt which gets retrieved in the file created in previous steps public/client.html. In your index.js file add the following:
async function connectNgrok() {
let url = await ngrok.connect({
proto: 'http',
addr: 'https://localhost:3000',
region: 'eu',
// The below examples are if you have a paid subscription with Ngrok where you can specify which subdomain
//to use and add the location of your configPath. For me, it was gregdev which results in
//https://gregdev.eu.ngrok.io, a reserved subdomain
// subdomain: 'gregdev',
// configPath: '/home/pi/.ngrok2/ngrok.yml',
onStatusChange: (status) => { console.log(`Ngrok Status Update:${status}`); },
onLogEvent: (data) => { console.log(data); },
});
fs.writeFile('public/config/config.txt', url, (err) => {
if (err) throw err;
console.log('The file has been saved!');
});
}
Now this has all been configured, you can call Ngrok by calling the connectNgrok() function as shown below:
httpServer.listen(port, (err) => {
if (err) {
return console.log(`Unable to start server: ${err}`);
}
+ connectNgrok();
return true;
});
You can now test your stream. Run the following, while in the Raspberry Pi Terminal:
node index.js
After around 10 seconds (for the service to initialize), wave your hand in front of the motion sensor. If successful, you will see a Motion Detected! output in your Terminal window. Now go to the file on your Raspberry pi public/config/config.txt, copy this URL and paste it into your browser. Append /client to the end of the URL. For me, this was https://gregdev.eu.ngrok.io/client. Your browser will now show the published stream from your Raspberry pi, which has opened a headless Chromium browser instance and navigated to its local IP: https://localhost/serve.
Installing Vonage Messages
To use the new Vonage Messages API, which sends SMS messages whenever motion gets detected, you’ll need to install the beta version of our Node SDK. Run the following command:
npm install nexmo@beta
The Messages API requires you to create an application on the Vonage Developer portal, and an accompanying a private.key which gets generated when creating the app. Running the command below creates the application, sets the webhooks (Which aren’t required right now so leave them as quoted), and finally a key file called private.key.
nexmo app:create "My Messages App" --capabilities=messages --messages-inbound-url=https://example.com/webhooks/inbound-message --messages-status-url=https://example.com/webhooks/message-status --keyfile=private.key
Now that you’ve created the application, some environment variables need setting. You will find your API key and API secret on the Vonage Developer Dashboard.
The VONAGE_APPLICATION_PRIVATE_KEY_PATH is the location of the file you generated in the previous command. This project had it stored in the project directory, so for example: /home/pi/pi-cam/private.key
The VONAGE_BRAND_NAME doesn’t get used in this project, but you are required to have one set for the Messages API, I’ve kept it simple HomeCam
Finally, the TO_NUMBER is the recipient that receives the SMS notification.
VONAGE_API_KEY=
VONAGE_API_SECRET=
VONAGE_APPLICATION_PRIVATE_KEY_PATH=
VONAGE_BRAND_NAME=HomeCam
TO_NUMBER=<your mobile number>
At the top of your index.js file import the Vonage package:
const Vonage = require('nexmo');
To create the Vonage object which is used to make the API requests, under the definition of the OpenTok object, add the following:
const vonage = new Vonage({
apiKey: process.env.VONAGE_API_KEY,
apiSecret: process.env.VONAGE_API_SECRET,
applicationId: process.env.VONAGE_APPLICATION_ID,
privateKey: process.env.VONAGE_APPLICATION_PRIVATE_KEY_PATH,
});
Inside, and at the end of your connectNgrok() function, add functionality that updates your Vonage application with webhooks to handle inbound-messages and the message-status with the correct URL (the Ngrok URL):
vonage.applications.update(process.env.VONAGE_APPLICATION_ID, {
name: process.env.VONAGE_BRAND_NAME,
capabilities: {
messages: {
webhooks: {
inbound_url: {
address: `${url}/webhooks/inbound-message`,
http_method: 'POST',
},
status_url: {
address: `${url}/webhooks/message-status`,
http_method: 'POST',
},
},
},
},
},
(error, result) => {
if (error) {
console.error(error);
} else {
console.log(result);
}
});
Sending an SMS
The notification method of choice for this tutorial is SMS, sent via the Messages API. The Vonage library has already been installed into this project, so no need to configure it. In the index.js file, add a new function called sendSMS(), this takes the URL and the number you’re expecting to receive the SMS on. Then, using the Messages API, sends an SMS notification that the camera has detected motion.
function sendSMS() {
const message = {
content: {
type: 'text',
text: `Motion has been detected on your camera, please view the link here: ${url}/client`,
},
};
vonage.channel.send(
{ type: 'sms', number: process.env.TO_NUMBER },
{ type: 'sms', number: process.env.VONAGE_BRAND_NAME },
message,
(err, data) => { console.log(data.message_uuid); },
{ useBasicAuth: true },
);
}
Now call the sendSMS() function by adding:
createSessionEntry(session.sessionId);
+ sendSMS();
There we have it! All you have to do now is SSH into your Raspberry Pi and start the server within your project directory running:
node index.js
Your server is now running, and your Raspberry Pi is to detect motion, which it will then do the following:
- Start an OpenTok session,
- Save the Session ID to the database,
- Send an SMS to your predetermined phone number with a link to the stream,
- Start a publishing stream from the Raspberry pi.
You’ve now built yourself a home surveillance system in a short time, which can be accessed anywhere in the world!
The finished code for this tutorial can be found on the GitHub repository.
Below are a few other tutorials we’ve written implementing the Vonage Video API into projects:
- Stream a Video Chat With Vonage Video API
- Add Texting Functionality to a Video Chat With Vonage Video API
- Real-Time Face Detection in .NET with OpenTok and OpenCV
Don’t forget, if you have any questions, advice or ideas you’d like to share with the community. I’d love to hear back from anyone that has implemented this tutorial and how your project works.